
How to Clean Your Aeropress While Camping

Table of Contents
- The Magic of the AeroPress "Squeegee" Action
- Step-by-Step: The Water-Efficient Field Clean
- Managing Coffee Grounds: Leave No Trace (LNT) Principles
- Deep Cleaning and Removing Coffee Oils Off-Grid
- Essential Gear for Keeping Your Setup Pristine
- Common Pitfalls and Pro Tips for Camp Cleaning
- Frequently Asked Questions
The Magic of the AeroPress "Squeegee" Action
One of the primary reasons the AeroPress has become the gold standard for backcountry brewing is its inherent self-cleaning design. Unlike a French press, which requires significant amounts of water to rinse out stubborn grounds from a mesh screen, the AeroPress utilizes a rubber plunger that acts as a squeegee. As you press your coffee, the seal wipes the inner walls of the chamber, pushing almost every coffee particle and most of the oils down through the filter. By the time you reach the "hiss" at the end of your brew, the chamber is remarkably clean compared to any other manual brewing method.
However, "remarkably clean" isn't the same as "sterile" or "oil-free." Over several days of camping, the small amount of residual coffee oil left on the seal and inside the chamber can begin to oxidize. This leads to a rancid, bitter flavor profile that will ruin even the most expensive specialty beans. Understanding how to leverage the plunger's mechanical action while supplementing it with minimal water is the key to maintaining a high-quality brew while miles away from a kitchen sink.
For the off-grid traveler, efficiency is everything. You don't want to waste your precious drinking water on scrubbing gear, but you also don't want to attract wildlife with the scent of old coffee or ruin your next morning's ritual. By mastering the "pop" technique—where you eject the puck of grounds immediately after brewing—you can keep your AeroPress in top shape with as little as two ounces of water. This balance of mechanical cleaning and strategic rinsing is what keeps NomadBrewers happy on the trail.

Step-by-Step: The Water-Efficient Field Clean
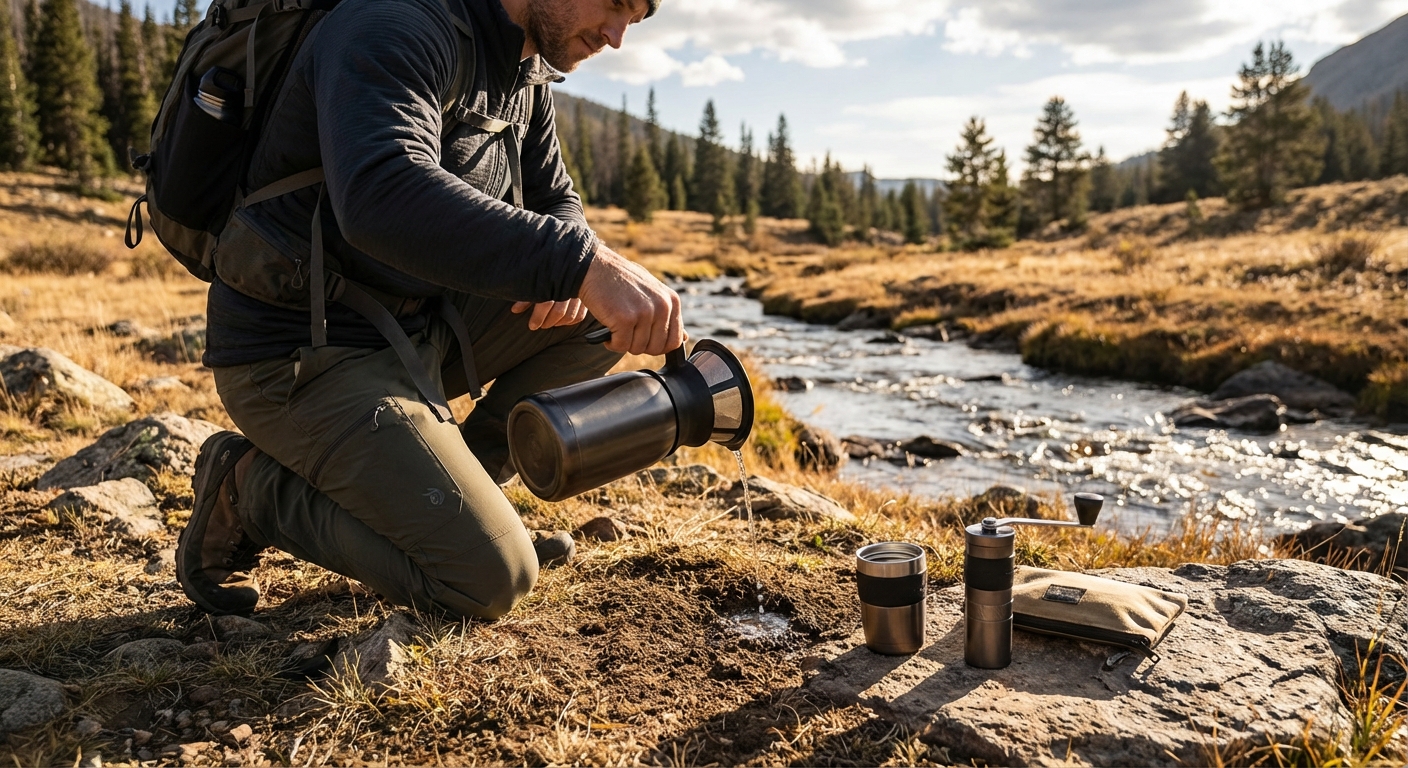
When you are camping, water is often your most valuable resource. The goal of a field clean is to remove 99% of the residue using the least amount of liquid possible. The first and most important step happens the moment you finish your brew. Do not let the AeroPress sit with the used puck inside. As the device cools, the coffee oils thicken and the grounds begin to stick to the chamber walls. Immediately after the "hiss," remove the filter cap and push the plunger all the way through to eject the puck into your waste container.
Once the puck is gone, you’ll notice a thin film of moisture and a few stray grounds on the rubber seal. Instead of reaching for a gallon of water, take a clean, damp cloth or even a small piece of paper towel and wipe the seal and the end of the plunger. This removes the "active" residue before it has a chance to dry. If you are in a high-dust environment, like a desert campsite, this step is vital because any grit that gets trapped between the seal and the chamber will eventually scratch the plastic, compromising the vacuum seal over time.
Finally, give the filter cap a quick shake or a light rinse. If you are using paper filters, they usually come out with the puck, leaving the cap relatively clean. However, if you use a metal reusable filter, this is where you will need to spend a little more of your water. A quick "pulse" rinse—pouring a tiny stream of water through the mesh—is usually enough to clear the holes. Always store the AeroPress with the plunger pushed all the way through or completely removed to prevent the rubber seal from being compressed and losing its shape during storage in your pack.
{{PRODUCT_CARD:B07YVL8D2Y}}
The AeroPress Go is our top recommendation for anyone prioritizing portability without sacrificing the quality of their brew. We love it because it’s a completely self-contained system; the brewer, scoop, and stirrer all fit inside the included drinking mug, which also acts as a protective carrying case. This is best for backpackers, bike-packers, and solo travelers who need to keep their kit organized and compact.
The standout feature is the integrated silicone lid that keeps everything secure, preventing your gear from rattling or getting dirty in your pack. The Go is slightly smaller than the original AeroPress, brewing about 8oz (237ml) per press, which is perfect for a standard camp mug. The only drawback is the smaller capacity if you're brewing for a group, but its ease of cleaning and durability more than make up for it. Compared to the standard model, the Go feels much more "ruggedized" for the rigors of trail life.
{{/PRODUCT_CARD}}
Managing Coffee Grounds: Leave No Trace (LNT) Principles
One of the biggest mistakes campers make is assuming that coffee grounds are "natural" and therefore okay to dump anywhere. While grounds are organic, they are highly acidic and contain concentrated caffeine, which can be toxic to local micro-fauna and disruptive to the soil chemistry in delicate alpine or desert environments. Furthermore, the scent of spent grounds is a powerful attractant for bears, raccoons, and rodents. Following Leave No Trace (LNT) principles means treating coffee grounds exactly like any other food waste: pack it in, pack it out.
To manage this effectively, we recommend carrying a dedicated "waste bag"—a heavy-duty, leak-proof silicone bag or a simple reinforced plastic bag. Because the AeroPress creates a dry, compacted puck, it is much easier to transport than the wet, slurry-like mess left behind by a French press. Simply "pop" the puck directly into your waste bag. If you are concerned about weight on a long-distance hike, you can spread the grounds on a flat rock in the sun for an hour to dehydrate them before packing them away, though this should only be done if you can ensure no wildlife will get to them.
In some specific front-country campgrounds, there may be designated organic waste bins, but never assume that burying grounds is an acceptable alternative. In many popular outdoor areas, the sheer volume of visitors means that "natural" decomposition can't keep up with the amount of waste being left behind. By keeping your grounds contained, you protect the wilderness and ensure that campsites remain pristine for the next traveler. It’s a small effort that makes a massive difference in preserving the off-grid experience.
Handling Reusable Filters in the Wild
Minimizing Gray Water Impact
When rinsing your AeroPress, the resulting "gray water" (water containing coffee particles and oils) must be handled responsibly. Never rinse your brewer directly in a stream, lake, or spring. Even biodegradable soaps can harm aquatic life and promote algae growth. Instead, carry your rinse water at least 200 feet away from any water source and scatter it over a wide area of absorbent soil. This allows the earth to act as a natural filter, breaking down the oils and organic matter before they can reach the water table.
Using a small collapsible camp sink or a dedicated rinse bottle can help you control the volume of gray water you produce. If you find yourself in an area where scattering gray water isn't allowed, you’ll need to collect your rinse water in a sealable container and dispose of it at a proper utility sink or dump station. This might seem like a hassle, but for the nomad who values the environment as much as their coffee, it’s a non-negotiable part of the ritual.
Deep Cleaning and Removing Coffee Oils Off-Grid
While the daily "squeegee and wipe" method works for short trips, if you are on the road for weeks at a time, you will eventually notice a sticky residue building up on the rubber plunger. This is a accumulation of polymerized coffee oils. These oils are stubborn; they don't dissolve in cold water and will eventually cause the plunger to lose its smooth glide, making it harder to press and potentially causing "blowouts" where hot coffee sprays out the sides. A deep clean is necessary every 7 to 10 days of continuous use.
For a deep clean in an off-grid setting, you’ll need hot water and a drop of biodegradable soap. Heat a small amount of water to just below boiling—the same temperature you use for brewing is perfect. Disassemble the AeroPress completely. Add a drop of soap to the chamber, fill it halfway with hot water, and use your travel brush or a clean cloth to scrub the interior walls. Pay special attention to the ridges where the filter cap screws on, as these are prime locations for old grounds to hide and mold to grow.
The most critical part of the deep clean is the rubber seal. Remove the seal from the plunger if your model allows it (the newer silicone seals are easier to manage), and wash it thoroughly with soapy water. If the seal feels "tacky" even after washing, it may need a soak in a 50/50 mixture of white vinegar and water, which is a great natural degreaser to keep in your van-life kit. Once cleaned, ensure every component is bone-dry before reassembling to prevent any "musty" odors from developing inside the airtight chamber.
{{PRODUCT_CARD:B00AJW7966}}
The AeroPress Replacement Seal is an essential "spare part" for any serious off-grid traveler. While the original seal is incredibly durable, it is the one part of the system that will eventually fail due to friction and oil exposure. We recommend keeping one of these in your repair kit because a failed seal means no coffee. It’s best for long-term travelers and van-lifers who rely on their AeroPress daily and can't easily access a post office for replacements.
The standout feature of the official replacement is the food-grade silicone construction, which offers a perfect airtight fit and better heat resistance than generic off-brand versions. It’s easy to swap out—just pop the old one off and slide the new one on. The only drawback is that it’s a specialized part; you won't find it at a local hardware store in the middle of nowhere. Compared to buying a whole new unit, replacing just the seal is the more sustainable and cost-effective choice for the eco-conscious nomad.
{{/PRODUCT_CARD}}
Common Pitfalls and Pro Tips for Camp Cleaning
One of the most common mistakes is storing the AeroPress with the plunger partially inside the chamber. Over time, this applies constant pressure to the rubber seal, causing it to compress and eventually leak. Always store your AeroPress with the plunger pushed all the way through so the seal is "relaxed" on the other side, or store the two pieces separately. This simple habit can double the lifespan of your seal, which is crucial when you're months away from a replacement.
Another pitfall is using abrasive scrubbers like steel wool or sand to clean the plastic chamber. The AeroPress is made of high-quality copolyester or polypropylene, but it can still be scratched. Scratches create microscopic grooves where oils and bacteria can hide, making the device much harder to clean in the long run. Stick to soft cloths, sponges, or specialized nylon travel brushes. If you have stubborn stains, a soak in hot water with a bit of baking soda is a much safer way to lift them without damaging the material.
Finally, don't forget the "hidden" areas. The filter cap has small holes that can become clogged with fine silt or coffee dust, especially if you use a metal filter. Periodically check these holes by holding the cap up to the light. If they look blocked, use a safety pin or a stiff brush to clear them. A clear cap ensures even pressure distribution during the brew, which leads to a more balanced extraction and a better-tasting cup of coffee.
Frequently Asked Questions
Can I use river water to clean my AeroPress while camping? You should only use filtered or boiled water to clean any part of your coffee gear that comes into contact with your mouth or the brewed coffee. River water can contain pathogens like Giardia or Cryptosporidium. If you are already boiling water for your coffee, use the leftover hot water in your kettle to give the AeroPress a quick rinse. This ensures that you aren't introducing harmful bacteria into your brewing system while trying to keep it clean.
If you are in a situation where water is extremely scarce, it is better to "dry clean" the AeroPress by wiping it thoroughly with a clean paper towel than to use contaminated water. The heat from your next brew will provide some level of sanitization, but it is not a substitute for proper hygiene. Always prioritize your health by using the same water standards for cleaning as you do for drinking.
Is it okay to use biodegradable soap in the backcountry? Yes, but only if used correctly. Even the most "eco-friendly" soaps, like Dr. Bronner’s, require soil to break down. You should never use soap directly in a lake or stream. When deep cleaning your AeroPress, use only a tiny drop of soap and ensure you are at least 200 feet away from any water source. Dispose of the soapy water by digging a small "cat hole" or scattering it over a large area of dry ground.
In many cases, hot water alone is sufficient to remove coffee oils if you clean the device immediately after use. Soap should be reserved for those weekly deep cleans or when the residue becomes noticeably sticky. By minimizing soap usage, you reduce your environmental footprint and make your water supply last longer during your trip.
How do I clean a reusable metal filter while camping? Reusable metal filters are great for reducing waste, but they require a bit more attention than paper filters. To clean one in the field, hold the filter by the edges and pour a small amount of hot water through the "back" side (the side facing away from the grounds). This back-flushing action pushes the trapped fines out of the mesh. If you have a travel brush, a gentle scrub will help remove any stubborn oils.
If the metal filter becomes clogged and slows down your brew time, you can soak it in a cup of hot water with a bit of dissolved baking soda or vinegar. This will break down the oils that build up inside the microscopic holes. Always dry the filter thoroughly before storing it to prevent any metallic flavors from developing or mold from growing in the storage case.
What should I do if my AeroPress seal starts to leak? A leaking seal is usually caused by one of two things: a build-up of coffee oils or a compressed seal. First, try a deep clean with hot, soapy water to remove any oils that might be preventing a perfect vacuum. If that doesn't work, you can try the "hot water trick." Place the rubber seal in a bowl of very hot (not boiling) water for about 10 minutes. This can sometimes cause the material to expand slightly and regain its original shape.
If the seal is visibly cracked, nicked, or has become permanently hardened, it’s time for a replacement. This is why we recommend carrying a spare seal in your off-grid repair kit. A temporary fix in the field can be to wrap a small piece of plumber's tape around the plunger before sliding the seal back on, but this is a "last resort" measure and should be replaced with a proper seal as soon as possible.
How do I prevent my AeroPress from smelling like old coffee? The "old coffee" smell is caused by trapped oils that have gone rancid. The best prevention is to never store the AeroPress while it’s wet or contains used grounds. After cleaning, let all the parts air dry completely before packing them away. If you’re on the move and must pack it immediately, try to wipe it as dry as possible with a clean cloth and then unpack it to air out as soon as you reach your next destination.
If a smell has already developed, a soak in a mixture of water and lemon juice or white vinegar will usually neutralize the odor. The acidity helps break down the rancid oils that are causing the scent. Regular deep cleans and ensuring the device is stored with the plunger pushed all the way through (to allow airflow around the seal) will keep your AeroPress smelling fresh and your coffee tasting great.
Our Top Picks for 2026
We've spent hours researching and testing to find the absolute best options currently available.

AeroPress Original Coffee Press - All-in-One French Press, Pour-Over & Espresso Style Manual Brewer, 2 Min Brew for Less Bitterness, More Flavor, Small Portable Coffee Maker, Travel & Camping Standard Gray
- The Brewer That Started It All – AeroPress Original was the first single cup coffee maker to combine 3 brew methods in one compact, portable device for a faster brew and better extraction giving coffee lovers a smooth, rich cup bursting with coffee bean flavor—without the bitterness or acidity found in other methods.
- A New Standard in Coffee Flavor – Equal parts French press, pour-over, and espresso, AeroPress patented 3 in 1 technology distills the best of all three brewing methods into one sleek, portable device. The result? A rich, full-bodied cup in under two minutes—free of bitterness and grit, and full of delicious coffee bean flavor.
- The Secret to AeroPress Superior Flavor – Air Pressure and micro-filtration work together to speed up extraction for less bitterness than other methods, so you can finally enjoy the full spectrum of coffee bean flavor, from smooth tasting notes to level of roast and country of origin

AeroPress Clear Coffee Press - All-in-One French Press, Pour-Over & Espresso Style Manual Brewer, 2 Min Brew for Less Bitterness, More Flavor, Small Portable Coffee Maker, Travel & Camping Standard Clear
- Clear Colors in Shatterproof Tritan – AeroPress Clear Coffee Press features our iconic 3 in 1 brew tech in crystal clear Tritan for a durable, shatterproof, travel-ready brewer that lets you see your brew – wherever your brew takes you.
- A New Standard in Coffee Flavor – Equal parts French press, pour-over, and espresso, AeroPress patented 3 in 1 technology distills the best of all three brewing methods into one sleek, portable device. The result? A rich, full-bodied cup in under two minutes—free of bitterness and grit, and full of delicious coffee bean flavor.
- The Secret to Our Superior Brew – Air Pressure and micro-filtration work together to speed up extraction for less bitterness than other methods, so you can finally enjoy the full spectrum of coffee bean flavor, from smooth tasting notes to level of roast and country of origin.

AeroPress Go, Extra Small Portable Coffee Maker Kit, Travel, Hiking & Camping, All-in-One French Press, Pour-Over & Espresso Style Manual Brewer, 2 Min Brew Makes a Less Bitter, More Flavorful Cup Go Grey
- Compact Travel Coffee System – Brew smooth, rich coffee anywhere in under 2 minutes. Includes a small, portable version of our 3-in-1 brewer and a lightweight, microwaveable mug with a silicone lid. Just unpack, brew and repack the coffee press back into the custom mug that doubles as a portable, travel container. Make hot or iced coffee on the go— traveling, camping, backpacking, hiking, and boating.
- A New Standard in Coffee Flavor – Equal parts French press, pour-over, and espresso, AeroPress patented 3 in 1 technology distills the best of all three brewing methods into one sleek, portable device. The result? A rich, full-bodied cup in under two minutes—free of bitterness and grit, and full of delicious coffee bean flavor.
- The Secret to AeroPress Superior Flavor – Air Pressure and micro-filtration work together to speed up extraction for less bitterness than other methods, so you can finally enjoy the full spectrum of coffee bean flavor, from smooth tasting notes to level of roast and country of origin.